Sensory Coping Caddy

Hey Loves!

In my last post, we talked about Sensory-Friendly Homeschool supplies. Today, I want to quickly share how I organized them. If you’re new here, you should know that organization, clean lines and neutral tones make my heart sing. I simply adore them. With that, I have two kids who just, most of the time, don’t show that they feel that way. So, part of my organization now is training them to know things have a place and to put them back. Who knew that was a part of parenting?

I digress. Anywho… let’s get to my happy place- the organization.

To start, and I suggest this with anything you are organizing, you have to access the size and the amount of the items, then the functionality of what you are looking for. For example, when I organized our pantry in April, I needed large bins with handles that were visually appealing. They also had to fit on the shelves, etc.

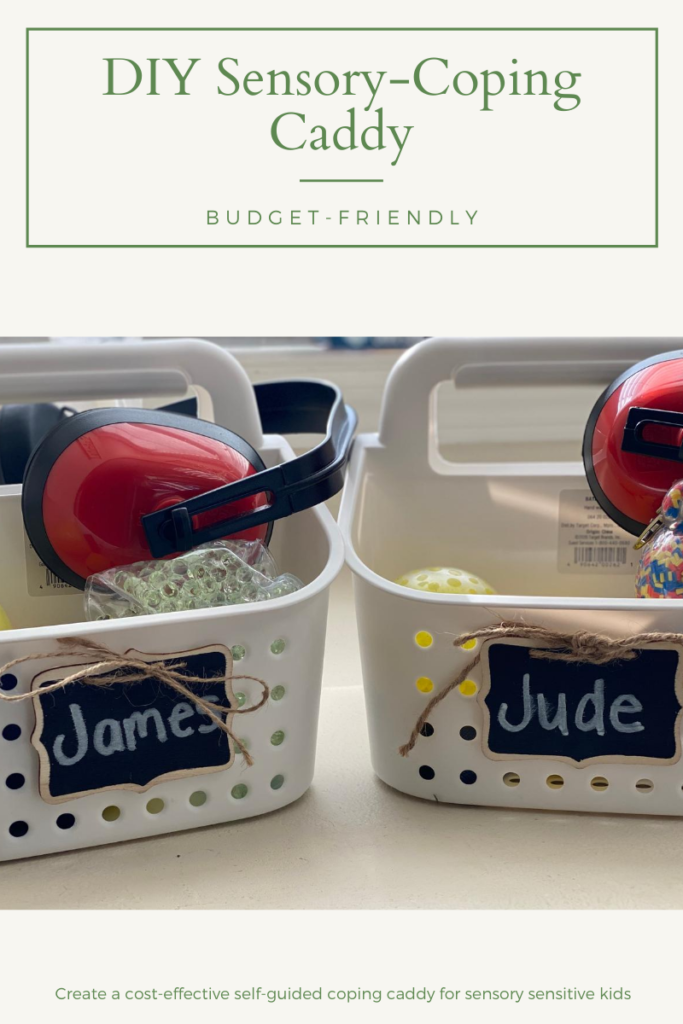
I gathered all the supplies I knew I wanted them to be able to use and grab at their leisure or with my prompt and separated them from a massager and  the weighted items (weighted vest, lap pad and belt). Once I had an idea of how many items would go in each kid’s caddy, then I chose the caddy. I went with these shower caddy’s from Target. They were inexpensive, sectioned and were deep enough to hold the items safely but allow for easy access for little hands. It also didn’t hurt I could get it via drive-up and not have to ship it.

Armed with my caddies, I decided what I would put in each compartment instead of just putting the items in the caddy. I promise there is a method to this madness. For me, doing it this way helps me visually take inventory and know where to tell my boys where to get them and put them back as I am training them to use these. It also helps know when to replace or restock items. For example, I can quickly check and see if I need to grab another chewlery (necklaces or clips that can be used for oral input and regulation) as the one I had in there is being washed.

Now to the fun part, sorting and placing, Yay!!!! I sectioned the 3 compartments into: Chewlery/Oral input, Fidgets and Coping/Calm Down. Sill with me?

After I knew where I wanted these items to go, then I placed them in their respective compartments.

I finished them off by adding a chalk label with their name. Viola!

If that was a bit hard to understand, I have a time-lapse video in this IG highlight and a YouTube video notating all the sensory things we have and where I got them.

Per usual, don’t hesitate to ask me any questions. I am here for you. Until next time,

Love you. Mean it.

Organizing and Crafting, part 2=HIT!

Hey Loves!

So, I am still in Spring cleaning mode and I am steadily working through organizing. After my dresser and jewelry (see earlier post, tags tutorial, organizing, crafting), I tackled my closet. It was a mess in so many ways. I was not maximizing the space, I couldn’t easily access my scarves, belts or handbags and it was a feat to find a good flip-flop. Here is the before. Don’t judge me. Yes, those are bushels… They worked when the Mr. and I lived in this teeny-tiny apartment and since I was finishing grad school when we got our house, they just stayed.

messy, messy, messy
messy, messy, messy

So again, I searched for DIY tutorials as the items I needed ran from $9.99-$19.99. Not that that is a bunch of money but if I don’t have to spend, why should I, right?

For my purses, I used this tutorial and for my scarves, this one. I went to Wal-Mart and purchased 3 sets of 12 shower curtain rings (pictured below-I did not use the metal one suggested in the tutorial), a metal over the door hangar (plastic can break as I have A LOT of handbags…) and (because it was on sale and cheaper than the supplies to make it) a belt organizer. I spent $13 including tax. That is $6 cheaper than 1 handbag organizer.

Wal-mart, $1.16
Wal-mart, $1.16

Wal-Mart, less than $6

image_9

Wal-Mart, less than $2

Anywho, I followed the tutorial for the hand bag organizer and that went super quick. I did use a tote to hold my clutches and wallets as they couldn’t be attached to the shower curtain rings. The finished result is pictured below. At first I thought it was a bit cumbersome, but it has been almost a week and I can’t say that I am not satisfied. My handbags are organized and I have maximized closet space. It does not interfere with the bedroom space as we always cracked the door to my closet for proper ventilation. If I anything I would get two singular door hangers to separate the items, but I am pretty sure that wouldn’t change much for me because my handbags are large.

I attempted to follow the tutorial for the scarf organizer but my tape wouldn’t stick. (I didn’t have the tape she suggested and so I tried packing tape, no go). So I used some ribbon I had lying around too attach the curtain rings to the hanger. I was tired and hard-headed so I didn’t make any cute bows or even measure the ribbon, I just made sure they were secure. For $1.16, this is the best storage I have ever had for my scarves! I am thoroughly satisfied.

packing tape, good for packing

the beginning, I lined up the first row of rings

all done!
all done!

My sandals, flip flops and some flats, I purchased an under-bed shoe organizer for $6.99 from Bed Bath and Beyond ( and had a 20%off coupon). Again, I couldn’t make one for cheaper and this holds more than just flip flops.

it went in my closet not under the bed

Again, I am in awe of all the crap I had. Good will donations are soon to come. However, now I can accessorize freely! Yay! Comment and share!

Cleaning and Crafting=HIT!

Hey Loves!

I have been a busy bee lately and now I am getting even busier. As Spring has sprung, I am in the mindset of Spring cleaning. I composed my “To-Clean List” (will be posted later) as well as the items we need to buy to complete said cleaning. In preparation, I started cleaning out some serious danger areas of our bedroom. I started with my dresser (pictured below) that was full of JUNK! My jewelry was everywhere and not accessible. I had perfume literally collecting dust because I never wear it as they contain artificial scents and are not holistic. So I decided to clean, throw out and craft.

I started by going to Pintrest and search ‘jewelry organizers’ and saw this and this. They looked easy and inexpensive. I went to my local Dollar store and purchased:

dollar store finds
dollar store finds

  1. 2 paper towel holders
  2. Wire (it came in a 3 pack)
  3. 1 picture frame

Then I got to work. I must admit, I didn’t read any of the instructions on the tutorial. I just saw them and said ‘I can do that’ and then did it. You are more than welcome to refer to the tutorials above. I must also apologize. I got so caught up in crafting, I didn’t take step-by-step photos. *gives self two slaps on the wrist* I will do better. I promise. In the meantime here is what I did and what I used for each item. Enjoy!

*Note* For all three items I used left over fabric from other projects so it was already cut and I am unsure of the exact specifications for each. However, I am sure I did not use more than 1 yard for all three projects.

Here are photos of the before and after. The tutorials are below. Thanks! Comment and share!

A dresser of junk
A dresser of junk

Clean and organized!

A closer look at the bracelet display

Earring Display

Items needed

  1. Fabric (amount depends on how big your picture frame is)
  2. Picture frame (size depends on how much space you have and how many earrings)
  3. Wire (you can also use mesh wire, they didn’t have that at the dollar store)
  4. Hot glue gun and sticks

Process

  1. Remove backing and glass from frame.
  2. (make sure glue gun is ready to go) measure fabric for frame backing and cover by streaming glue on the frame backing and placing fabric on top of hot glue. Press down to make sure the fabric is securely attached.
  3. Measure wire the width of the frame and cut the amount strips you need. I used three. Secure to the frame by dotting with a small drop of hot glue and holding until secure. Do this for all the strips. Make sure it is secure on both sides of the frame. (This was the trickiest part for me. It may take a little patience as well as trial and error.)
  4. Insert backing covered with fabric and secure.
  5. Organize earrings and hang! You can always add more wire strips as your collection grows. As for placement, I put the longest/biggest earring at the bottom, medium in the middle in small at the top.

Necklace Display

Items Needs:

  1. Cork Board
  2. Fabric
  3. Glue Gun/Sticks
  4. Push pins or straight pins

Process

  1. Similar to the earring display, measure the amount of fabric you need to cover the front of the cork board.
  2. Using the hot glue gun, attach the fabric to all sides of the cork board; make sure it is secure.
  3. Align the straight pins any way that is most accommodating to size of your cork board and the amount of necklaces you intend to display (I didn’t have push pins. #fail They are much easier to use and you can get them in cute coordinating colors. I doubled strait pins and used them to hang the necklaces. If you have really heavy necklaces, the straight pins will not hold. Straight pins are temporary.)
  4. Organize and hang the necklaces!

Bracelet/Watch Display

Items Needed

  1. Paper towel (A horizontal one, not a vertical one)
  2. Paper towel roll
  3. Fabric
  4. Hot glue gun and fabric

Process

(If you can’t tell, there a is a lot of similarity in these projects)

  1. Measure fabric to cover paper towel roll (you can use multiple pieces as the bracelets and or watches will cover the lines) and cover using hot glue gun
  2. Organize and slide on bracelets and watches
  3. Adjust covered paper towel roll to fit in holder!

*Note* I covered the bottom of my paper towel holder with fabric, the same way I covered all the other stuff, but I wouldn’t recommend it unless you have a high grade sturdy cotton fabric.

*Update* I know accessorize more because I can see everything and I don’t have to dig through that pile of junk to find what I need! yay!